Stephen R. Lee
This material is copyrighted, 1996, by Stephen R. Lee. Permission to reproduce and use is granted provided no fee is charged and the author, and this web page, are given credit.
Here I describe how to make your own gangline out of polyethelene rope. I prefer gangline made out of rope, or rope with cable inside. Many mushers, particularly those with large numbers of dogs, use cable (coated or uncoated) or rope with cable inside. I do not describe how to make these ganglines here. Only rope ganglines.
Making your own gangline is simple, provided you know what the gangline should look like and how it is supposed to function. The basic idea is to get the dogs running side by side, in a tightly coupled line very near to the lengthwise axis of symmetry of the sled. This naturally increases the pulling efficiency of the dogs, as pulling in the tangential directions is minimized.
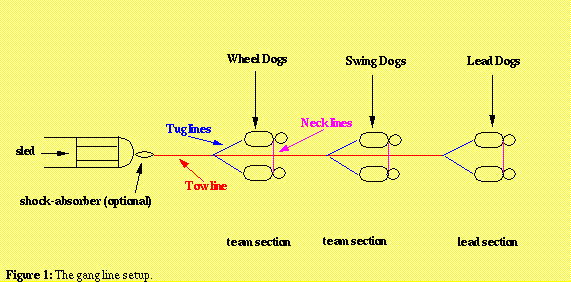
The gangline is the series of ropes, clips, cables, and so on that attach your team of sled dogs to your sled. There are effectively three components to a gangline: the tow line, tug lines, and neck lines. The tow line is typically made out of 3/8 inch polyethelene rope. It connects to the sled and runs up between the dogs which are hitched side by side on either side of the tow line. To the tow line, the tug lines are attached. These are usually made out of 1/4 inch poly rope and are "braided" into the tow line. The tug lines attach to the harnesses on the dogs. Finally, the neck line, also 1/4 inch poly rope, is also braided into the tow line and attaches to the dogs collar. The dog does not pull from this line, and you should be sure to design your gangline such that this does not happen. It is merely used to keep the dog close to the tow line, thereby maximizing pulling strength. The gangline setup is depicted in Figure 1.
The shock absorber is usually made out of a combination of shock cord and tow line material. Many use this to minimize shock on the wheel dogs as the sled traverses a trail. Some sleds have a shock absorbing device built in (I have three sleds, only one of which has a built-in shock absorber).
Ganglines are usually made in sections consisting of two dogs, one on each side of the tow line. In Figure 1, we see three sections. Two team sections and a lead section. Depending on the number of dogs you run, and how you want to run them, you may need to make one or more sections. Each section is made with a loop on each end of the tow line, thus allowing you to hook as many sections together as needed.
For those that only have two dogs, you may only wish to make a leader section of gangline. The leader section is the one at the front of the above drawing. The difference between the leader sections and the team sections is simple. In the team sections, the neck lines and tug lines are braided into the tow line. In the leader section, only the tug lines are braided into the tow line. The neck line is simply a small section of 1/4 poly with a brass clip on each end, to attach the two dogs together. However, if you wish to run only one lead dog, and run your other dog single file, you will need to make both a team section and a lead section of gang line. Even those that have single leaders, but multiple dogs, will probably want to make their ganglines in the manner I am going to describe.
In the follwing sections, techniques for "stitching" and "braiding" rope are discussed, as well as the basics for making team and lead sections of gangline.
Stitching and Braiding Rope
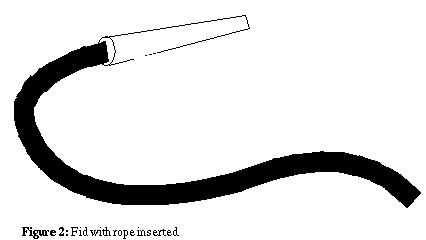
To make all of the sections, you will have to make loops in the lines and braid (or stitch) two pieces of rope together. This is accomplished using a device called a fid. A fid is a hollow plastic or aluminum tube, with a point (not a sharp point, often blunt) on one end. In the other end, the rope is inserted. You can then use the fid as a needle, and thread the rope into itself several times to make a loop, or thread one rope through another to join pieces of rope. This only works well with poly (polyethelene) rope. Fids should be available at your local hardware store. Just think of a fid as a special needle, allowing you to "sew" with the rope. Fids come in different sizes, so be sure and get the two sizes you will need to make your gangline. A fid with attached rope is shown in Figure 2.
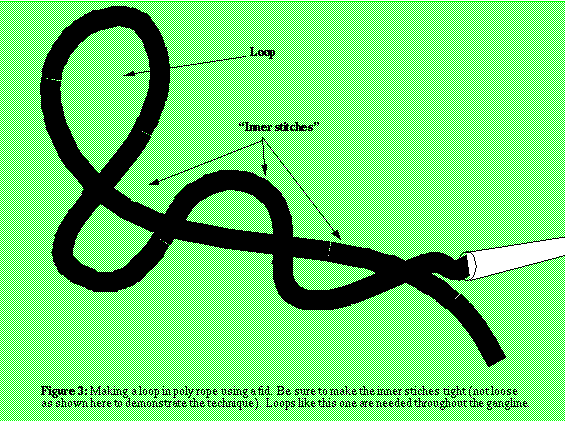
To make a loop in a line, insert the end of the rope into the fid. Next, with the fid in your right hand, pull approximately 12 inches of rope between your right and left hands. Then, take your right hand and push the fid all the way through the rope at something less than it's midpoint. Pull the rope through intil the loop is the size that you want. Then, push the fid all the way through the rope in the opposite direction, and pull it tight. Repeat this process until there it becomes difficult to turn the fid around and continue. At this point, you will have several "stitches" in the rope that will hold the loop. See Figure 3.
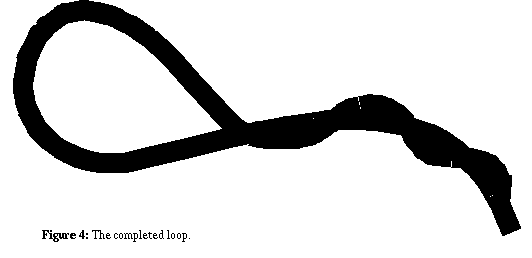
To finish the loop off, insert the fid into the rope and run it inside the rope, lengthwise, away from the loop. Then poke the end of the fid out the side of the rope and remove it. The result will be that the remaining rope inside the fid will be left inside the middle of the rope, leaving no loose ends. Practice this with some rope before you begin making your gangline. Figure 4 shows the completed loop with fid removed.
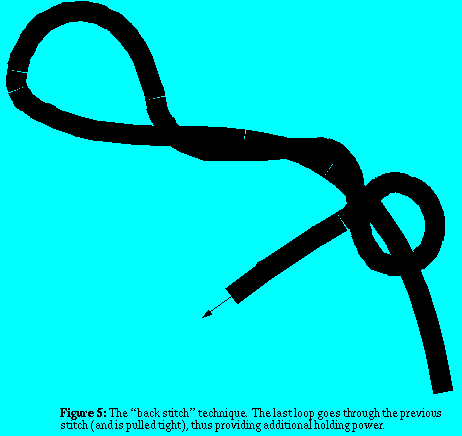
For extra holding strength, I often loop the fid and rope back through my last stitch. This back-stitch technique is shown in Figure 5.
To braid pieces of rope together, you effectively do the same thing as you would when making a loop. However, in this case, the fid is on the smaller rope (the 1/4 inch) for the tug line. You will have to be extra careful here, as you will need plenty of rope for the tug line because you need to make a loop in the end for the brass clip, and have enough to braid through the tow line and make the tug for the opposite side. This is described in more detail below.
Team Section
I cannot provide exact measurements here, as these may vary depending on the size of your dogs. However, the idea here is to construct a section of rope, in the neighborhood of 5 feet long or so, with the tug and necklines attached at the right places. Begin with a section of 3/8 poly and make a tow line, about 5 or 6 feet long. In either end of the tow line, put a nice big, secure, loop. Then make the tug lines. Here, you will need a long piece of 1/4 poly. About 6 inches from one of the loops in the tow line, run the tug line through the towline (using the fid). The tricky part here is to get the length of the tugline correct. You want the dogs to each pull in line from the tow line, not against one another, close to the tow line. This usually means about 30 inches of tug line (on each side), but not necessarily, You will have to experiment with your dogs to get this right. Once you have selected a length for one of the tug lines, double the 1/4 poly back through the tow line a couple of times, coming out on the opposite side of the tugline you just made. The idea here is that while you are making both of the tug lines from one piece of rope, you do not want the rope to slip through the tow line. Next, cut the rope off at the correct point for the opposite side tugline. The tug lines on each side of the gangline should be the same length. Any differences in dog sizes, if severe enough, are usually made up in the neckline.
Next, work on the necklines. You can either place the necklines in different locations given dog sizes, or place them in the same location and make them different lengths, or make them exactly the same. It is up to you. However, the distance between the connection points for the tug lines in a team section and a given neckline should be whatever the distance is from the connection point on the dog's harness to the connection point on the dog's collar (some slack is fine, but don't put in too much). Here, the method for attaching the neckline to the tow line is the same as for the tug lines.
Finally, you need to attach brass clips to the end of the neck lines and tug lines. This is accomplished by making a loop in the end of the ropes, but with the clips inserted into the rope before you make the loops. A nice additional touch is to add a very small loop of small cotton rope to the tow line. This allows you to clip the loose ends of the gangline (the neck lines and tug lines) to the tow line for storage.
Lead Section
This section is made the same as a team section, with a couple of important differences. First, you need only loop the back of the tow line. Second, the tug lines are braided at the end (or near it) of the opposte end of the tow line. Third, the neckline is not braided into the tow line at all, but rather is a piece of 1/4 in poly with clips on either end that attached to the two lead dog's collars. Otherwise, the construction steps and methods are the same as for the team section.
Shock Absorber
This is a simple device made from tow line rope and bungee cord. Simply put two loops in the end of 3/8 poly rope. Once the loops are made, this small piece should be approximately 8-12 inches long. Then, take some bungee cord and wind it around and around, passing it through the loops on each of the rope each time. Make about 4-6 wraps. Make sure that as you wind the bungee cord through the loops, you make the diameter of the loops about 1/2 the length of the rope. This means that the rope will hang down because the bungee cord wraps are shorter than the length of the rope. Once this is done, secure the bungee cord with some wire clamps. You now have a rather odd looking device, one with a loop on each end, with bungee cord looped between the loops, and extra rope hanging between the loops. See Figure 6. It will be obvious at hookup time what the purpose for this is.
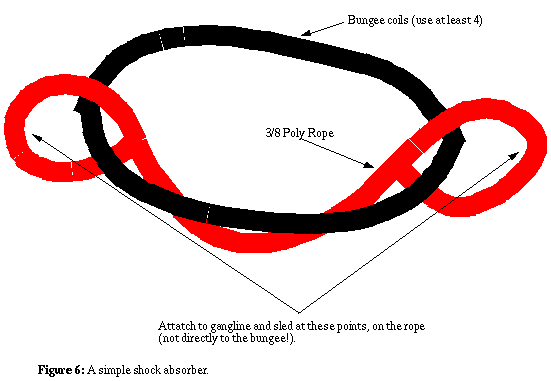
The shock absorber should go between the sled and the first team section. I use locking climbing carabeeners to hook the gangline to the sled. Therefore, you will take your carabeeners and hook one to a rope loop on the shock absorber and to the loop on the team section. The other carabeener goes to the other rope loop on the shock absorber and to the sled. Do not hook the carabeeners directly to the bungee! The function of the shock absorber should now be clear. As the dogs pull, they pull against the bungee wrap, not the rope directly. However, should the bungee break, which it will eventually do, the remaining rope in the shock absorber is there to hold the dogs. This gives the dogs more comfort while pulling, and helps to minimize jolts. For sleds that have this built in, making your own is clearly not necessary. However, I use mine on my two sleds that do not have it build in, as well as my training cart.
For those with only two dogs there are a couple of hook-up options. First, you can run them both in lead, which would mean you would only need the lead section (no team section). Second, you could run them one behind the other. In this case, you would hook both tug lines from the lead section to your lead dog, and not use a neckline at all. In your team section, you can hook both tugs and neck lines to your dog, or if you added the cotton rope loops, you can hook just one tug and one neck to the dog, and leave the other two hooked to the cotton rope for storage. It is up to you. For two dogs, I recommend trying them as dual leaders first.
I have found that these ganglines are convienient and easy to make, and have served me well. I can replace sections as needed, and I can add to or remove sections as the number of dogs in my kennel changes. I hope that you will also find them useful.
The making of ganglines is pretty well described in the text Mush! A beginner's Manual of Sled Dog Racing, Bella Levorsen, Ed. Sierra Nevada Dog Drivers, Inc., Arner Publications, 1976. ISBN 0-914124-06-4.