BUILD YOUR OWN DOG SLED
Note: I have lost track of Charlie Yeager. His old email address is yeagerc@server.greatlakes.k12.mi.us, but it no longer functions.
National Mine School, Ishpeming, Michigan, U.S.A.
This material is Copyright 1996 National Mine School, NICE Community School District. Used with permission.
INTRODUCTION
As part of the technology education program, an eighth grade middle school
technology education class was given the task of designing and
manufacturing a dog sled. Students investigated different types of dog
sled designs. The original design of the dog sled parts was done with
conventional drafting techniques. Students used a Mac Classic computer and
MacDraw II to do the computer drawings. To incorporate writing across the
curriculum, students kept journals noting their progress and wrote the
directions that are found below. To incorporate reading across the
curriculum, students read WOODSONG by Gary Paulsen.
The students' teacher, Charlie Yeager, previously taught math and science at
the high school. Due to budget cuts he was reassigned to National Mine
Middle School. Yeager is a musher and dog handler for Mark and Jill
Churchill of Gwinn, Michigan. Yeager wanted to do an interesting project
with his students yet still utilize the principles of technology. Students
began with an idea and ended up with a finished product.
The dog sled is a basket sled and could be used for sprint races, short
distance races or recreational mushing. It would make an excellent first
sled for the beginning musher.
DOG SLED PARTS LIST
Wooden Parts
- Back Brace - 1
- Brake Board - 1
- Brush Bow - 1
- Cross Pieces - 3
- Driving Handle - 1
- False Runner - 2
- Foot Pads - 2
- Front Slat Cross Pieces - 2
- Front Stanchion - 2
- Inside Slats - 5
- Rear Stanchion - 2
- Runners - 2
- Side Rails - 2
- Side Slats - 2
- Slat Braces - 4
- Wedge - 1
Hardware
- 10 - Runner Bolts Flat Head 1/4 in. Diameter, 2 in. Long and Lock Nuts
- 12 - Eyebolts 1/4 in. Diameter, 2 in. of Thread and Lock Nuts
- 1 - Hinge and 1/4 in. Diameter Bolts With Lock Nuts
- 1 - Brake Claw With 1/4 in. Diameter Bolts and Lock Nuts
- 2 - Brush Bow Slotted Head 1/4 in. Diameter Bolts and Lock Nuts
- 14 - Bed Slotted Head 1/8 in. diameter Bolts and Nuts
- 2 - Front Cross Slat Slotted Head 1/8 in Diameter Bolts 1 1/2" Long
Nuts and Washers
- 2 - Runner/Wedge Slotted Head 1/4 in. Diameter Bolts 2 1/2 in. Long
- 4 - Foot Pad Wood Screws 1 in. Long
- 1 pair - QCR Rails, Runners and Mounting Hardware
- 450 Feet - Nylon Cord
- Wood GLue
- Finishing Oil
- Varnish
- Wood Putty
- 1 - Bungee Cord 3 to 4 Feet Long
INDIVIDUAL DOG SLED PARTS
BACK BRACE
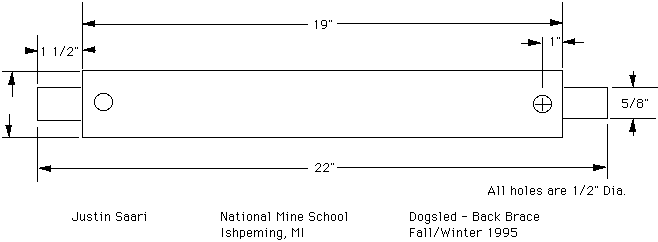
- Select a piece of knot free wood and cut it to measure 22 in. x 1 1/2
in. x 1 1/2 in.
- Cut tenons that measure 1 1/2 in. long and 5/8 in. x 5/8 in. on each end
of the crosspiece.
- Drill a 1/2 in. hole on each end of the back brace, centered, as shown
in the drawing.
- Using a rasp, round the edges of the back brace as shown in the drawing.
BRAKE BOARD
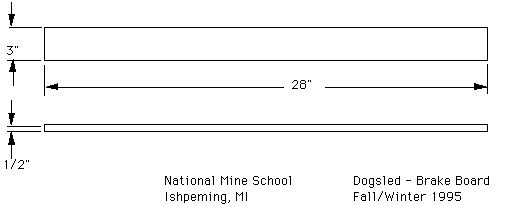
- Select a piece of knot free wood and cut it to measure 28 in. x 3 in. x
1/2 in.
- Sand the brake board until it is smooth.
- The brake board will be mounted with a hinge to the front main cross
piece.
BRUSH BOW
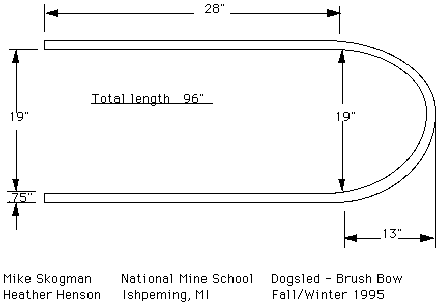
- Cut four or five strips of wood 1 1/2 in. x 1/8 in. x at least 96 in.
- Steam them to soften them or bend them green on a form that is curved in
front and 21 inches wide with a slight taper at the ends to a width of 19
inches.
- Clamp the strips to the form and let dry for a few days to a few weeks
if the wood has been steamed or for a few weeks if the wood was bent green.
- Remove the wood from the form and laminate the strips together using
either wood glue or contact cement. If you use wood glue, re-clamp the
strips to the form after the wood glue has been applied. Wipe off all
excess glue. Let the glue dry for 24 hours.
- Remove the brush bow from the form.
- Sand until smooth.
- Cut the ends to the proper length so that the brush bow can be bolted to
the front stanchions. Drill a 5/32 in. hole, centered, 3/4 in. from each
end.
DRIVING HANDLE
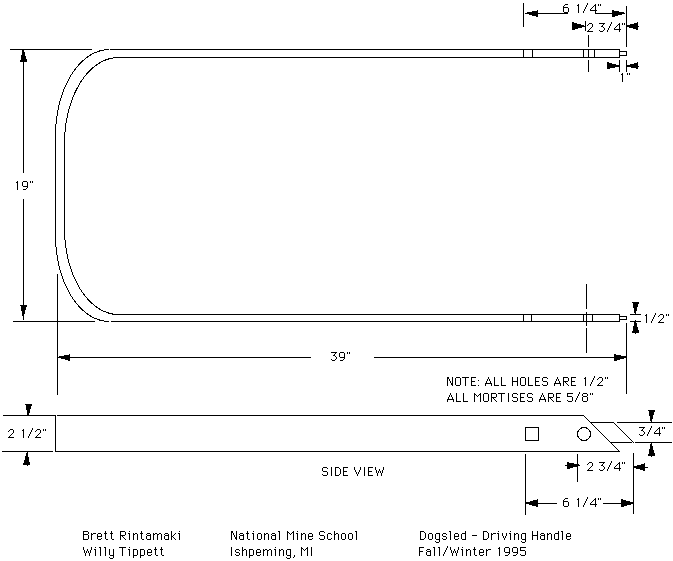
- Cut three or four strips of wood 1 1/2 in. x 1/8 in. x at least 96 in.
- Steam them to soften them or bend them green on a form that measures 19
in. x 39 in. with rounded edges at the top of the handle.
- Clamp the strips to the form and let dry for a few days to a few weeks
if the wood has been steamed or for a few weeks if the wood was bent green.
- Remove the wood from the form and laminate the strips together using
either wood glue or contact cement. If you use wood glue, re-clamp the
strips to the form after the wood glue has been applied. Wipe off all
excess glue. Let the glue dry for 24 hours.
- Remove the driving handle from the form.
- Sand until smooth.
- Cut a 1 in. x 3/4 in. x 3/8 in. tenon on the bottom as shown in the
drawing. This tenon should match the middle mortise hole in the false
runner.
- Cut a mortise hole 5/8 in. x 5/8 in. as shown in the drawing. Make
sure that the mortise hole is centered. The mortise hole should match the
tenon of the middle main cross piece.
- Drill a 1/2 in. hole, centered, as shown in the drawing. This hole will
be used to tie the sled together. This hole will allow you to tie the
false runner to the driving handle.
FALSE RUNNERS
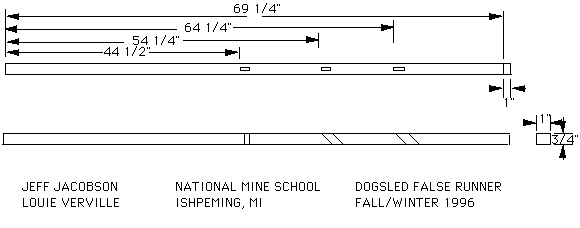
- Select wood for the false runners which is free from knots.
- Measure and mark the wood at 70 1/4 in. long by 1 1/2 in. wide and 3/4
in. thick. Cut the wood to the measurements listed.
- Cut the front of the false runners on a 45 degree angle as shown on the
drawing.
- Measure and mark mortise holes 3/4 in. x 1 in. x 3/8 in. The mortise
holes are placed at 44 1/2 in., 54 1/4 in., and 64 1/4 in. from the rear of
the false runners.
- Cut the mortise holes out. The dimensions of the mortise holes should
be 3/4" x 1" x 3/8". File them to fit the tenons.
- Attach the false runners to the runners. Drill 1/4" holes for the bolts
and eye bolts. Counter sink the holes in the runners. The Eye Bolts
should be installed about two inches on each side of the stanchions and
driving handle.
FOOT PADS
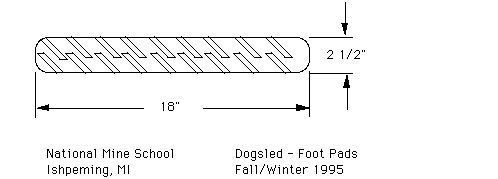
- Select two pieces of knot free wood measuring 18 in. x 2 1/2 in. x 1/2
in. Round the corners.
- Using a router, cut 1/4 in. grooves into the food pad as shown in the
drawing.
- Sand until smooth.
- When the varnish is still wet, apply a dusting of sand for traction or
glue or screw a rubber mat to the foot platform.
FRONT CROSS SLAT PIECES
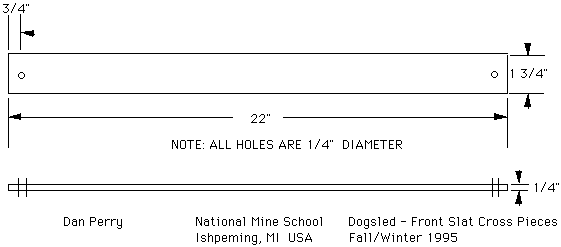
- Select a piece of wood without any knots or other imperfections.
- Cut it to 1 3/4 in. x 5/8 in. x 21 in.
- Sand with coarse sandpaper, medium sandpaper, and then fine sandpaper
until smooth.
- Drill 1/4 in. diameter holes as shown in the drawing, centered and 3/4
in. from each end.
- Using 1/4 in. bolts, bolt the front cross slat pieces to the side slats,
the wedge and the runners.
FRONT STANCHIONS
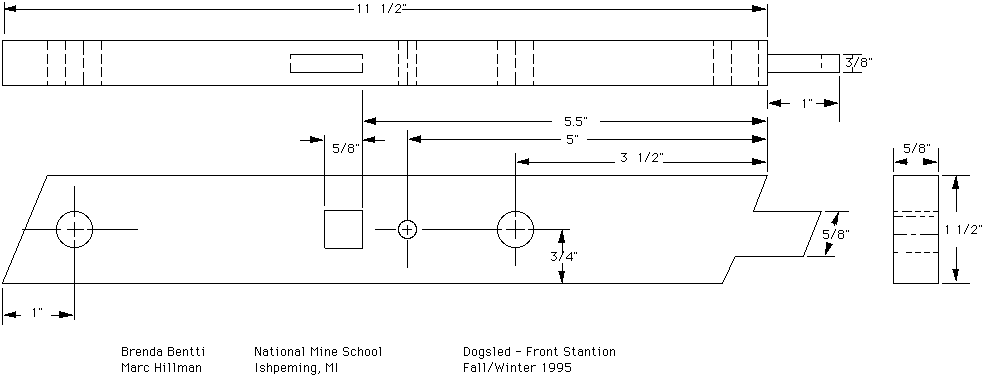
- Select a board that is knot free, about 15 inches long.
- Cut it at about a 67 degree angle (see drawing) so it is 11 1/2 in.
long, 5/8 in. thick and 1 1/2 in. wide.
- Cut a 1 in. x 3/4 in. x 3/8 in. tenon on the bottom as shown in the
drawing. This tenon should match the front mortise hole in the false
runner.
- Cut a mortise hole 5/8 in. x 5/8 in. Make sure that the mortise hole
is centered. This mortise hole should match the tenon of the front main
cross piece.
- Drill two 1/2 in. holes, centered, as shown in the drawing. These holes
will be used to tie the sled together. The top hole will allow you to tie
the side rail to the front stanchion The bottom hole will allow you to tie
the false runner to the front stanchion.
- Drill a 5/32 in. hole 1 1/2 in. from the hole on the tenon side as shown
in the drawing. This hole will be used to attach the brush bow.
INSIDE SLATS

- Select a piece of wood without any knots or other imperfections.
- Cut it down to 3/4 in. x 1/4 in. x 49 in.
- Sand with coarse sandpaper, medium sandpaper, and then fine sandpaper.
- Drill holes in the center (3/8 in.) with a 3/16 in. drill bit at 3 3/4
in. and 24 in. (from the same end)
- Bolt the inside slats to the other pieces of the bed.
MAIN CROSS PIECES

- Select a piece of knot free wood and cut it to measure 22 in. x 1 1/2
in. x 1 1/2 in.
- Cut tenons that measure 1 1/2 in. long and 5/8 in. x 5/8 in. on each end
of the cross piece.
- Using a rasp, round the edges of the cross pieces as shown in the drawing.
REAR STANCHIONS
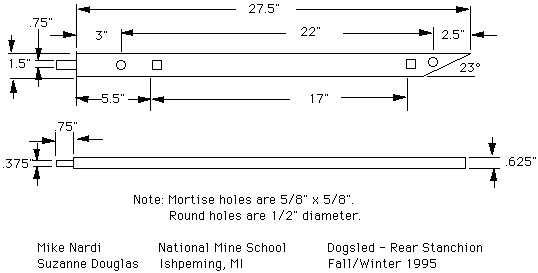
- Select a board that is knot free, about 30 inches long.
- Measure, mark and cut it (see drawing) so it is 28 1/4 in. long, 5/8 in.
thick and 1 1/2 in. wide.
- Cut a 1 in. x 3/4 in. x 3/8 in. tenon on the bottom as shown in the
drawing. This tenon should match the rear mortise hole in the false
runner.
- Cut two mortise holes 5/8 in. x 5/8 in. as shown in the drawing. Make
sure that the mortise holes are centered. The bottom mortise hole should
match the tenon of the rear main cross piece. The top mortise hole should
match the tenon of the back brace.
- Drill two 1/2 in. holes, centered, as shown in the drawing. These holes
will be used to tie the sled together. The top hole will allow you to tie
the driving handle to the rear stanchion The bottom hole will allow you to
tie the false runner to the rear stanchion.
RUNNERS
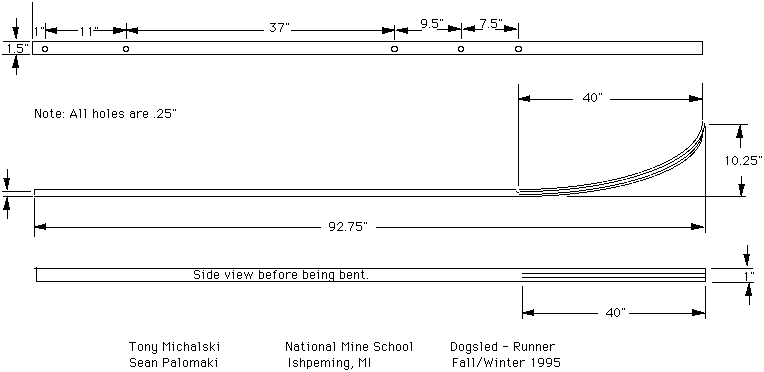
- Select a piece of wood that is about 100 in. long and knot free.
- Cut two pieces that measure 98 in. x 1 1/2 in. x 1 in.
- In the two pieces that are 98 in. long, make two cuts 40 in. long so
that the wood will bend as shown in the drawing.
- Cut four boards that measure 40 in. x 1 1/2 in. x 1/8 in. These boards
will be placed into the spaces cut in the 98 in. pieces.
- To laminate the curved portion of the runners, spread wood glue on both
sides of each of the 40 in. long pieces of wood and on the insides of the
98 in. long piece.
- Fit the 40 in. pieces inside the slits that were cut into the 98 in.
long pieces of wood. While the glue is still wet, clamp them to a form
that has been pre-cut to the bend of the runners. Begin clamping at the
straight end and work toward the curved end. Wipe off all excess glue.
Let the glue dry for 24 hours.
- Remove clamps and sand off any excess glue that may have dried on the
runners.
- Clamp the runners to the false runners to drill 1/4 in. holes for bolts
and eye bolts. Countersink the holes as needed.
SIDE RAILS

- Select a piece of wood without any knots or other imperfections.
- Cut it to 44 in. x 5/8 in. x 5/8 in.
- Sand with coarse sandpaper, medium sandpaper, and then fine sandpaper
until smooth.
- Steam until wood is flexible or bend when wood is green.
- The false runners must be attached to the runners; the stanchions
driving handle, main cross pieces, back brace and bed must be tied in
place. After this is done, take the wood out of the steamer and bend into
place. Clamp the side rails to the driving handle, the front stanchion and
the side slats.
- Let dry for a few days.
- Remove the clamps and tie the side rails to the driving handle, the
front stanchion and the side slats.
SIDE SLATS
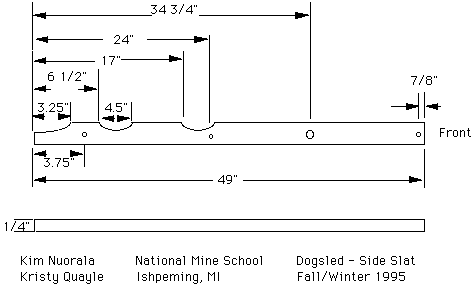
- Cut a piece of wood that measures 49 in. x 2 in. x 1/4 in.
- Mark the curves (as shown in the drawing) on the wood and cut them out
with a band saw, jig saw, scroll saw or coping saw.
- Measure and mark locations for the holes on the piece of wood then drill
the holes.
- Two 3/16 in. diameter holes should be centered and marked 3 3/4 in. and
24 in. from the rear end of the side slat. These will be used to bolt the
bed together.
- A 1/2 in. diameter hole should be centered and marked 34 3/4 in from the
rear end of the side slat. This hole will be used to tie the side rail to
the side slat.
- A 1/4 in. diameter hole should be centered and marked 7/8 in. from the
front end of the side slat. This hole will be used to bolt the front cross
pieces, the wedge, the side slats and the runners together.
SLAT BRACES
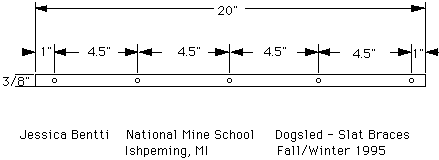
- Select a piece of wood without any knots or other imperfections.
- Cut it to 20 in. x 3/8 in. x 1/4 in.
- Sand with coarse sandpaper, medium sandpaper, and then fine sandpaper
until smooth.
- Drill 3/16 in. diameter holes as shown in the drawing.
- Bolt the slat braces to the other pieces of the bed.
WEDGE
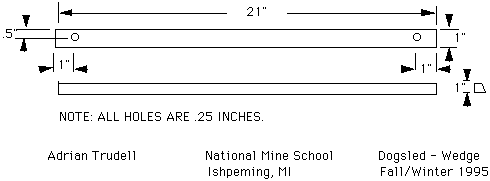
- Cut a piece of wood so it measures 21 in. x 1 in. x 1 in.
- Cut or rasp so that the wood resembles a wedge and it will fit in
between the slats and the runners near the front of the sled (see drawing
of wedge).
- Drill 3/4 in. holes, centered, 1 in. from the each end or the wedge as
shown in the drawing of the wedge. These holes will be used to bolt the
wedge to the runners. The side slats will be tied to the wedge.
DOG SLED ASSEMBLY DIRECTIONS
- Attach the false runners with 1/4 in. flat head bolts. Also install the
eyebolts to the runners and false runners. The eyebolts are used for tying
down the stanchions and driving handles.
- Bolt the wedge to the front of the runners.
- Tie the front stanchions, back stanchions and driving handle to the
eyebolts on the false runners and runners.
- Tie the main cross pieces to the driving handle, front stanchions, and
rear stanchions.
- Tie the back brace to the rear stanchions.
- Assemble the bed by bolting the side slats, inside slats and slat
crosspieces together.
- Tie the bed in place by tying it to the wedge, the front stanchions and
rear stanchions, the driving handle and the rear main cross piece.
- Steam the side rails. Bend and clamp them to the driving handle,
stanchions and side slats.
- Tie the side rails to the driving handle and rear stanchions, the front
stanchions and to the side slats.
- Attach the brush bow to the front stanchions with two slotted head 1/4
in. diameter bolts and lock nuts. Tie the front of the brush bow to the
side slats and to the wedge.
- Attach the foot pads to the back of the false runners with wood screws.
- Attach the brake board to the front main cross piece with 1/4 in.
diameter bolts and a hinge. Wrap the bungee cord around the brake board and
attach it to the back brace.
- Attach the metal claw brake to the brake board using 1/4 in. diameter
bolts.
- Attach the QCR rails to the bottom of the wooden runners. Slide on the
plastic runners and bolt them in place.
Copyright 1996 National Mine School, NICE Community School District.